Using Ext Gantt with Ruby on Rails
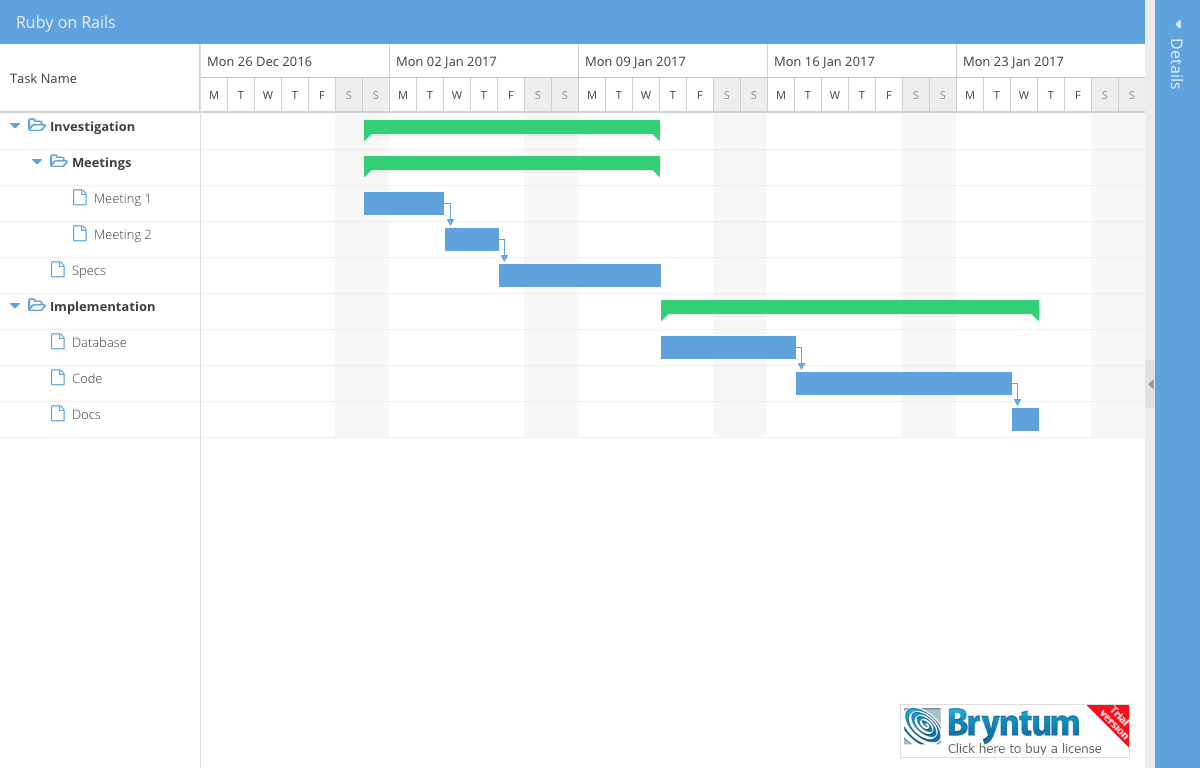
My name is Johan and I’ve just started working at Bryntum after working with Ext JS for about 8 years at my previous job. During my first week there was a forum post requesting a Ruby on Rails demo which I decided to build. This blog post contains a guide that explains the basics of integrating Ext Gantt with RoR. The guide shows step by step how to set up an application from scratch. At the end of the guide you should have an application looking something like this:
Assumptions
This guide assumes that you already have Rails installed and know how to use it. If you need help getting started with Rails, there is an excellent guide over at https://guides.rubyonrails.org/getting_started.html.
Create an application
Open a terminal and type this in the folder where you want to create your application:
$ rails new gantt
You should now have a folder named gantt containing a brand new Rails application.
Create a data layer
Add models & data
Ext Gantt has five different kinds of stores: resources, assignments, dependencies, calendars and tasks. In this guide we are creating a basic application and will only be using tasks and dependencies. We need a model representing each of these entities. Use the Rails generator (in the root of the gantt folder) to create the models with fields as shown below:
$ bin/rails generate model Task Name:string StartDate:datetime Duration:integer DurationUnit:string ParentId:integer
$ bin/rails generate model Dependency From:integer To:integer Type:integer
Now let’s create the corresponding tables in the database, by running a migration:
$ bin/rake db:migrate
And finally we seed some data by pasting the following into db/seeds.rb:
Task.create([
    {Name: 'Investigation', StartDate: DateTime.parse('2017-01-01'), Duration: 8, DurationUnit: 'd'},
    {Name: 'Meetings', StartDate: DateTime.parse('2017-01-01'), Duration: 8, DurationUnit: 'd', ParentId: 1},
    {Name: 'Meeting 1', StartDate: DateTime.parse('2017-01-01'), Duration: 2, DurationUnit: 'd', ParentId: 2},
    {Name: 'Meeting 2', StartDate: DateTime.parse('2017-01-04'), Duration: 2, DurationUnit: 'd', ParentId: 2},
    {Name: 'Specs', StartDate: DateTime.parse('2017-01-06'), Duration: 4, DurationUnit: 'd', ParentId: 1},
    {Name: 'Implementation', StartDate: DateTime.parse('2017-01-12'), Duration: 10, DurationUnit: 'd'},
    {Name: 'Database', StartDate: DateTime.parse('2017-01-12'), Duration: 3, DurationUnit: 'd', ParentId: 6},
    {Name: 'Code', StartDate: DateTime.parse('2017-01-17'), Duration: 6, DurationUnit: 'd', ParentId: 6},
    {Name: 'Docs', StartDate: DateTime.parse('2017-01-25'), Duration: 1, DurationUnit: 'd', ParentId: 6},
])

Dependency.create([
    {From: 3, To: 4, Type: 2},
    {From: 4, To: 5, Type: 2},
    {From: 7, To: 8, Type: 2},
    {From: 8, To: 9, Type: 2}
])
And then seed by running:
$ bin/rake db:seed
Add controllers
The controllers will be called using AJAX from our JavaScript code to fetch data for Ext Gantt. The application created in this guide is read only, which means that we only need index & show actions in the controllers. Generate a controller per model by running:
$ bin/rails generate controller Tasks index show
$ bin/rails generate controller Dependencies index
Implement models and controllers
When we generated the controllers, Rails also generated corresponding views for each controller and action. We want the controllers to supply data in JSON-format directly, we do not need the views. Remove app/views/tasks and app/views/dependencies.
Now let’s implement the models, starting with app/models/task.rb:
class Task < ActiveRecord::Base
  # a task can have many subtasks (children)
  has_many :children, :class_name => 'Task', :foreign_key => 'ParentId'
  # it might also belong to a parent task (if it is a subtask)
  belongs_to :parent, :class_name => 'Task', :foreign_key => 'ParentId'

  # root nodes (ParentId is null) as json tree
  def self.get_root_tree
    roots = Task.where('"tasks"."ParentId" IS NULL')
    {
        :success => true,
        :children => Task.json_tree(tasks)
    }
  end

  # as json tree
  def self.json_tree(tasks)
    tasks.map do |task|
    {
      :Id => task.id,
      :Name => task.Name,
      :StartDate => task.StartDate,
      :Duration => task.Duration,
      :DurationUnit => task.DurationUnit,
      :leaf => task.children.count() == 0,
      :expanded => true,
      :children => task.children.count() == 0 ? nil : Task.json_tree(task.children)
     }
   end
 end
end
And then app/models/dependencies.rb:
class Dependency < ActiveRecord::Base
  # as json with desired fields
  def self.json(deps)
    deps.map do |dep|
      {
          :Id => dep.id,
          :From => dep.From,
          :To => dep.To,
          :Type => dep.Type
      }
    end
  end
end
This goes into TasksControllers index action (app/controllers/tasks_controller.rb):
# fetch root tasks (ParentId is null) as json-tree
tree = Task.get_root_tree
# render (send to client)
render :json => tree
And this goes into show:
# ExtJS TreeStore requests root node as 'root'
if params[:id] == 'root'
  # act as if index was called
  index
else
  # fetch single task
  task = Task.find(params[:id])
  render :json => task.to_json
end
And in the index action of DependenciesController (app/controllers/dependencies_controller.rb):
# fetch all dependencies from database
dependencies = Dependency.all
# render as json (send to client)
render :json => Dependency.json(dependencies)
Almost ready to test our data layer, the only thing missing is routes. Add the following to routes.rb:
resources :tasks
resources :dependencies
Also remove any routes to views (get ‘tasks/index’ and get ‘dependencies/index’).
Test the data layer
If you haven’t done it already, start your web server (or use the Rails internal one, run bin/rails server). If you visit /tasks you should see the following JSON response:
{"success":true,"children":[{"Id":1,"Name":"Investigation","StartDate":"2017-01-01T00:00:00.000Z","Duration":8,"DurationUnit":"d","leaf":false,"expanded":true,"children":[{"Id":2,"Name":"Meetings","StartDate":"2017-01-01T00:00:00.000Z","Duration":8,"DurationUnit":"d","leaf":false,"expanded":true,"children":[{"Id":3,"Name":"Meeting 1","StartDate":"2017-01-01T00:00:00.000Z","Duration":2,"DurationUnit":"d","leaf":true,"expanded":true,"children":null},{"Id":4,"Name":"Meeting 2","StartDate":"2017-01-04T00:00:00.000Z","Duration":2,"DurationUnit":"d","leaf":true,"expanded":true,"children":null}]},{"Id":5,"Name":"Specs","StartDate":"2017-01-06T00:00:00.000Z","Duration":4,"DurationUnit":"d","leaf":true,"expanded":true,"children":null}]},{"Id":6,"Name":"Implementation","StartDate":"2017-01-12T00:00:00.000Z","Duration":10,"DurationUnit":"d","leaf":false,"expanded":true,"children":[{"Id":7,"Name":"Database","StartDate":"2017-01-12T00:00:00.000Z","Duration":3,"DurationUnit":"d","leaf":true,"expanded":true,"children":null},{"Id":8,"Name":"Code","StartDate":"2017-01-17T00:00:00.000Z","Duration":6,"DurationUnit":"d","leaf":true,"expanded":true,"children":null},{"Id":9,"Name":"Docs","StartDate":"2017-01-25T00:00:00.000Z","Duration":1,"DurationUnit":"d","leaf":true,"expanded":true,"children":null}]}]}
And /dependencies should yield:
[{"Id":1,"From":3,"To":4,"Type":2},{"Id":2,"From":4,"To":5,"Type":2},{"Id":3,"From":7,"To":8,"Type":2},{"Id":4,"From":8,"To":9,"Type":2}]
Create and serve Ext Gantt
Time for the JavaScript part of the example. We need to setup ExtJS and Ext Gantt, create a JavaScript application and have it served through rails. Lets begin by creating a start page for the application.
Create a start page
When Rails created our application it made a default ApplicationController which we can use to serve a start page. A layout was also generated at app/views/layout/application.html.erb. Edit it to contain the following:
<!DOCTYPE html>
<html>
<head>
  <title>RoR</title>
  <!--Ext and Gantt styles (using triton theme) -->
  <link href="/examples/extjs-6.0.1/build/classic/theme-triton/resources/theme-triton-all.css" rel="stylesheet" type="text/css"/>
  <link href="/products/gantt/examples-latest/resources/css/sch-gantt-triton-all.css?ver=4.2.1" rel="stylesheet"/>
  <!--Ext and Gantt scripts -->
  <script src="/examples/extjs-6.0.1/build/ext-all.js" crossorigin="anonymous" type="text/javascript"></script>
  <script src="/examples/extjs-6.0.1/build/classic/theme-triton/theme-triton.js" type="text/javascript"></script>
  <script src="/products/gantt/examples-latest/gnt-all-debug.js?ver=4.2.1" type="text/javascript"></script>
  <!-- Scripts and styles injected by Rails -->
  <%= stylesheet_link_tag    'application', media: 'all', 'data-turbolinks-track' => true %>
  <%= javascript_include_tag 'application', 'data-turbolinks-track' => true %>
  <%= csrf_meta_tags %>
</head>
<body>
<%= yield %>
</body>
</html>
Add a view at app/views/application/index.html.erb. The HTML for our JavaScript application will be generated dynamically (by ExtJS and Ext Gantt), so leave the view empty 🙂
Now add a route (in routes.rb) to make it the start page:
root 'application#index'
Create the JavaScript application
Add a JavaScript file under app/assets/javascripts called gantt.js. Put the following code in it:
Ext.onReady(function () {
    // Create Gantt panel including stores
    var gantt = Ext.create('Gnt.panel.Gantt', {
        title           : 'Ruby on Rails',
        rowHeight       : 40,
        loadMask         : true,
        viewPreset       : 'weekAndDayLetter',
        readOnly: true,

        columns: [{ xtype: 'namecolumn', width: 200}],

        // Stores use rest-proxy to match RoR
        taskStore: Ext.create('Gnt.data.TaskStore', {
            proxy: { type: 'rest', url : '/tasks' }
        }),

        dependencyStore: Ext.create('Gnt.data.DependencyStore', {
            autoLoad: true,
            proxy   : { type: 'rest', url : '/dependencies' }
        })
    });

    // A viewport to fill the entire page
    var viewport = Ext.create('Ext.container.Viewport', {
        layout: 'fit',
        items : [ gantt ]
    });

    Ext.QuickTips.init();
});
Add some style
Almost done, we only need a tiny bit of css to make Ext Gantt look as intended. Add gantt.css to app/assets/stylesheets and enter the following:
.sch-ganttpanel .x-grid-cell {
    height : 35px;
}
That’s it
All done, visit the root of your webserver to see the example in action. You can also view the finished example here and download the source (in the Details panel to the right).
Happy hacking!